Designer Guide · DTF Powerhouse Delta

From the client's files
to an approved gangsheet.

Everything the designer's PC does, in the order you do it: the job, the designs, the sheet, the preview on WhatsApp, the approval, and the hand-over to the operator.

Designer's PC licence keyDesign & Project desk + Operator desk
this guide
Operator's PC licence keyDesign & Project desk + Operator desk
Admin PC licence keySales desk + Accounts
1 Activate2 Start a job3 Designs4 The gangsheet 5 A client's project file6 Preview & approval7 To the operator 8 Tools9 Renewal & help
1

Install and activate this PC

Your shop has three licence keys, one for each PC. They came in one mail, each with its name.

  1. Open the download link in the licence mail and run the Setup. It puts DTF Powerhouse Delta on the desktop and in the Start menu.
  2. Open the program. It asks for the email address of your shop and the licence key.
  3. Enter the key of this PC - the Designer's PC licence key. One key runs on one PC at a time.
  4. The top of the window now ends with Designer's PC, and Licence in the menu shows which key this is, until when it is valid, and the Terms & Conditions.
Moving to another PCLicence → Disconnect Licence From This PC on the old PC, then activate on the new one. You can do this yourself twice; after that we reset it for you.
InternetThe program checks its licence with our server. Without internet it keeps working for 72 hours, then waits until the connection is back.
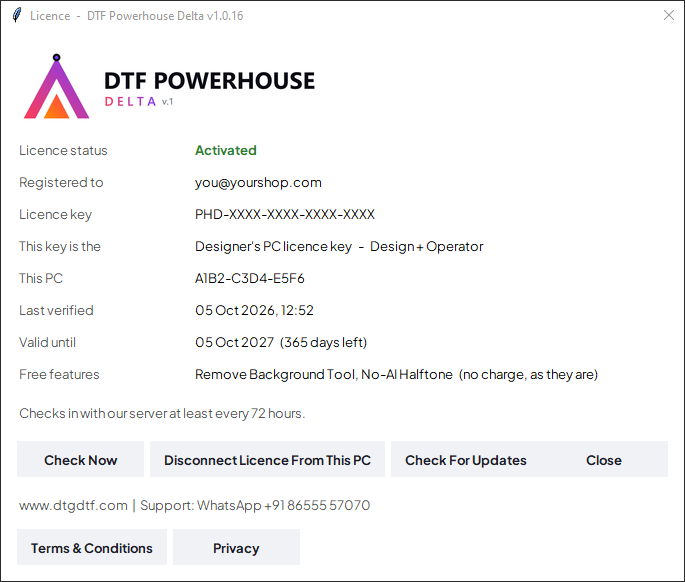
The Licence window of DTF Powerhouse Delta
Licence → Licence...: which key this is, what it opens, the free features, and the agreement. Tap the picture to see it large.
2

Start a job for a client

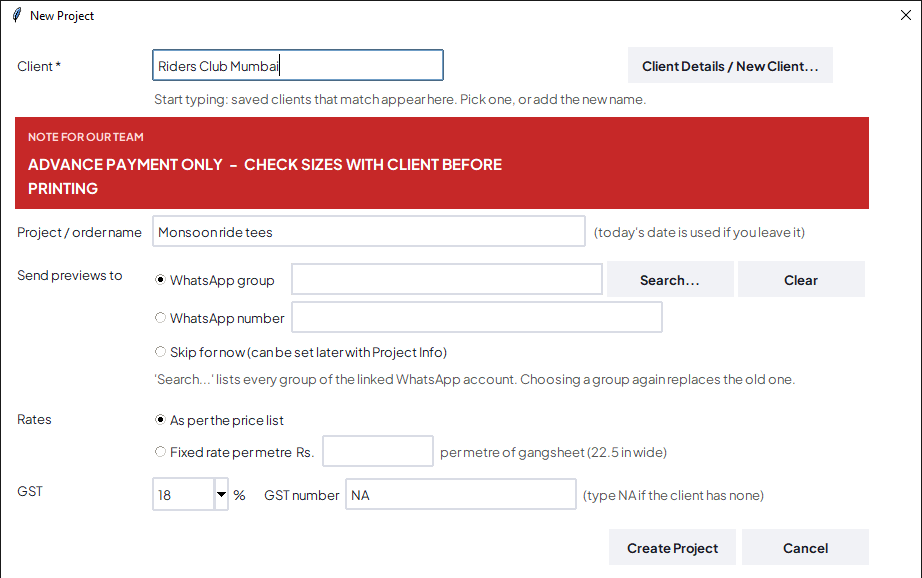
Every job belongs to a client and has a name. + New Project asks for both.

  1. Press + New Project.
  2. Client: start typing. The search finds a client by name, company, WhatsApp number (the last digits are enough), or the name of their WhatsApp group - also with a small spelling slip.
  3. A new client? Type the name and press Client Details / New Client... to save the contact, rates and notes.
  4. Project / order name: what the client calls the order. Left empty, today's date is used.
  5. Send previews to: the client's WhatsApp group or number. Search... lists the groups of the shop's WhatsApp.
  6. Rates: as per the price list, or a fixed rate per metre for this client.
Note for our teamWhen the client has a note in Client Details, it shows in a red box the moment the client is chosen - and stays over the job while you work. Read it first.
The search is forgivingPart of the name, the last digits of the WhatsApp number, a word of the group's name, or the name with a letter wrong: each finds the client. The list says why a client matched - the group, the number, the company.
The New Project window with a client's note in a red box
New Project. The red box is this client's note from Client Details. Tap the picture to see it large.
3

Put the designs on the table

PNG and TIFF files with a transparent background. Each file is one row: its size, how many, and onto the sheet.

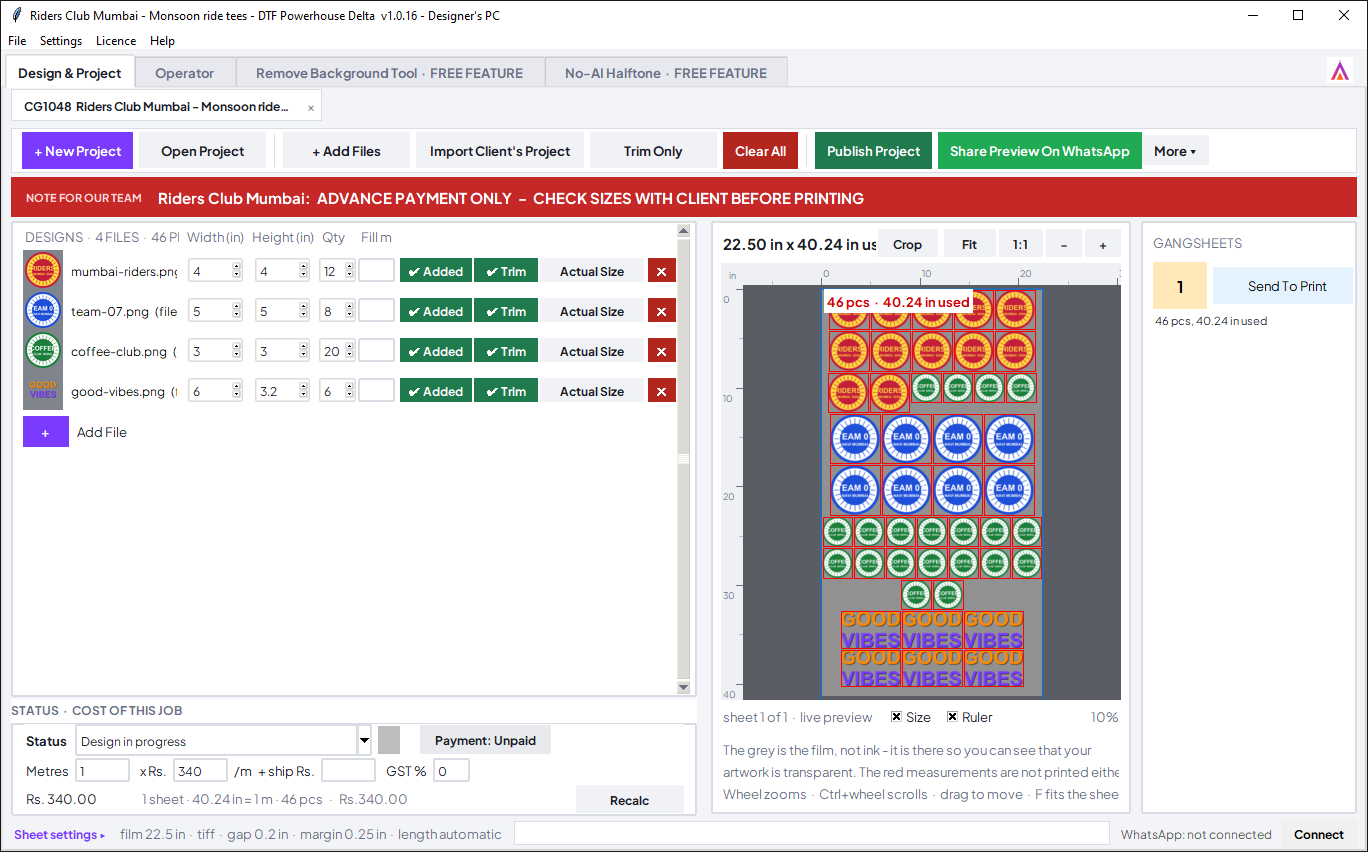
The Design and Project desk of DTF Powerhouse Delta
The Design & Project desk: buttons on top, the client's note, the designs on the left, the gangsheet on the right. Tap the picture to see it large.
  1. + Add Files, or drag the files from a folder onto the window.
  2. Type the Width in inches. The height follows by itself.
  3. Type the Qty. Or type metres in Fill m: the program works out how many pieces fill that length.
  4. Press Add on the row. It turns to ✔ Added and the pieces are on the gangsheet.
On a rowWhat it does
TrimCuts the empty transparent border off this design, so the pieces sit closer.
Actual SizePuts the width back to the file's own size. A second click brings back what you had typed.
✕Takes the design off the job.
Trim Only (top)Trims every design of the job in one go.
The designs of a job with their sizes and quantities
One row per design: width, height, quantity, Fill m, Added, Trim, Actual Size. Tap the picture to see it large.
4

The gangsheet packs itself

  • The sheet is 22.5 inch film. Every piece you add is placed as tight as the gap allows; the length is whatever the job needs.
  • The head of the preview says how many pieces are on and how many inches are used.
  • Fit shows the whole sheet, 1:1 the real size, - + zoom. The mouse wheel zooms too; drag to move.
  • The grey is the film, not ink. The red measurements are not printed.
  • Sheet settings (bottom left): film width, gap between pieces, margin, and the longest sheet.
  • The cost of the job is under the table: metres × rate, shipping, GST. Recalc works it out again.
A packed gangsheet in the preview
46 pieces on 40.24 inches of film. Each gangsheet has its own Send To Print button. Tap the picture to see it large.
5

When the client sends their own project file

Clients who use the free DTF Powerhouse lay out their own sheet and send you one file (.dtfjob). It comes into your job, under your client name.

  1. Make the job first: + New Project, with the client from your own client book.
  2. Press Import Client's Project and choose the file the client sent - or drag the file onto the window.
  3. The client's designs arrive on the table with the sizes and quantities they set. A bar on the button shows the percentage while it works.
  4. Check the sheet, then carry on as with any job.
Good to knowThe job remembers who sent the file and what they called it. Nothing that was already on your job is touched.
The buttons of the Design and Project desk
Import Client's Project sits beside + Add Files. Tap the picture to see it large.
6

Preview to the client, and the approval

Design in progress→Preview sent - waiting for approval→Approved - waiting for payment→Approved - ready to print

Link the shop's WhatsApp once

  1. Press Connect at the bottom right. A code appears.
  2. On the shop's phone: WhatsApp → Linked devices → Link a device, and scan the code.
  3. The corner now says the WhatsApp is connected. Each PC links on its own.

Send the preview

  1. Press Share Preview On WhatsApp. The client gets the picture of every sheet and the price, and is asked to reply 1 to confirm.
  2. The status becomes Preview sent - waiting for approval by itself.
  3. When the client replies 1, ok, yes or approved, the job marks itself Approved - waiting for payment and the other desks are told.
Button (under More ▾ in a narrow window)What the client gets
Send ReminderThe job's last status again, as text.
Send Payment DetailsThe shop's bank and UPI details.
History...Nothing - it shows you every status the job went through, when, and from which PC.
No WhatsApp on this PC?Share Preview copies the picture and shows the text, ready to paste into any chat.
The status and the cost of a job
Status and cost of the job, under the designs. Tap the picture to see it large.
7

Hand the job to the operator

  1. Set Status to Approved - ready to print. The program asks one thing: payment completed already, or payment pending. For a payment that is completed it asks for the proof (UPI or bank reference, or cash).
  2. Press Publish Project. The job is saved as one file in the shop's work folder, where the other PCs find it.
  3. The job is now at the top of the Operator desk, in green, on every PC of the shop.
Note for our teamA client whose note says "advance payment only" stays on Approved - waiting for payment until the money is in. The operator sees that job in red.
Your key opens the Operator desk tooThe Designer's PC and the Operator's PC open the same two desks, so either PC can take over when the other is busy. See the Operator Guide.
8

The tools

Free featureThe Remove Background Tool and No-AI Halftone - and any tool we add - are free features: included at no charge, provided as they are, and not part of what the licence fee pays for. The program says so on the tab and over the tool.

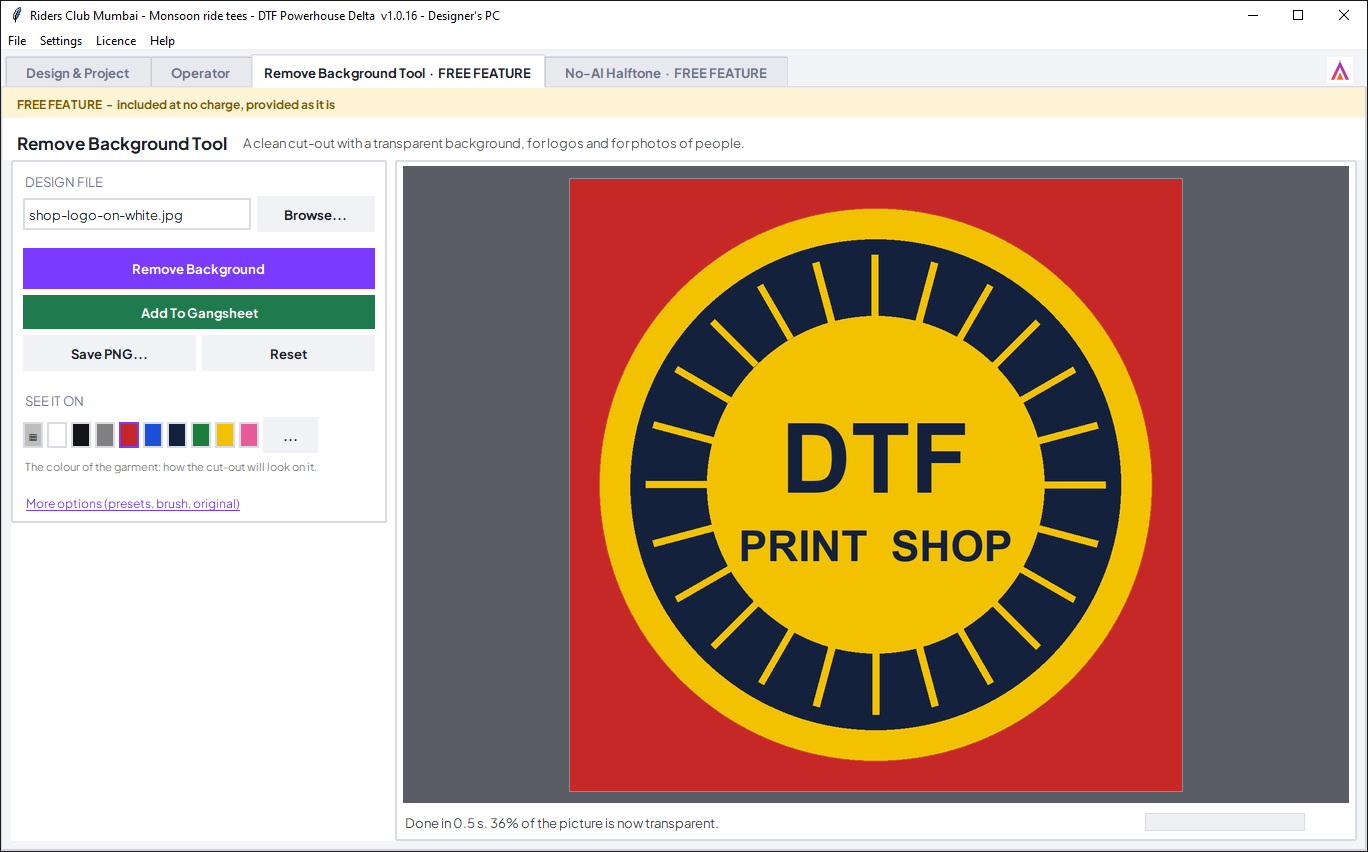
Remove Background Tool

  1. Browse... and choose the picture - a logo on white, or a photo.
  2. Remove Background. The background becomes transparent.
  3. See it on: click a garment colour to check the edges against it.
  4. Add To Gangsheet: the button shows the percentage, then the gangsheet opens with the cut-out on the table.

Reset starts over. More options opens presets, a brush to erase and restore by hand, and the original for comparison.

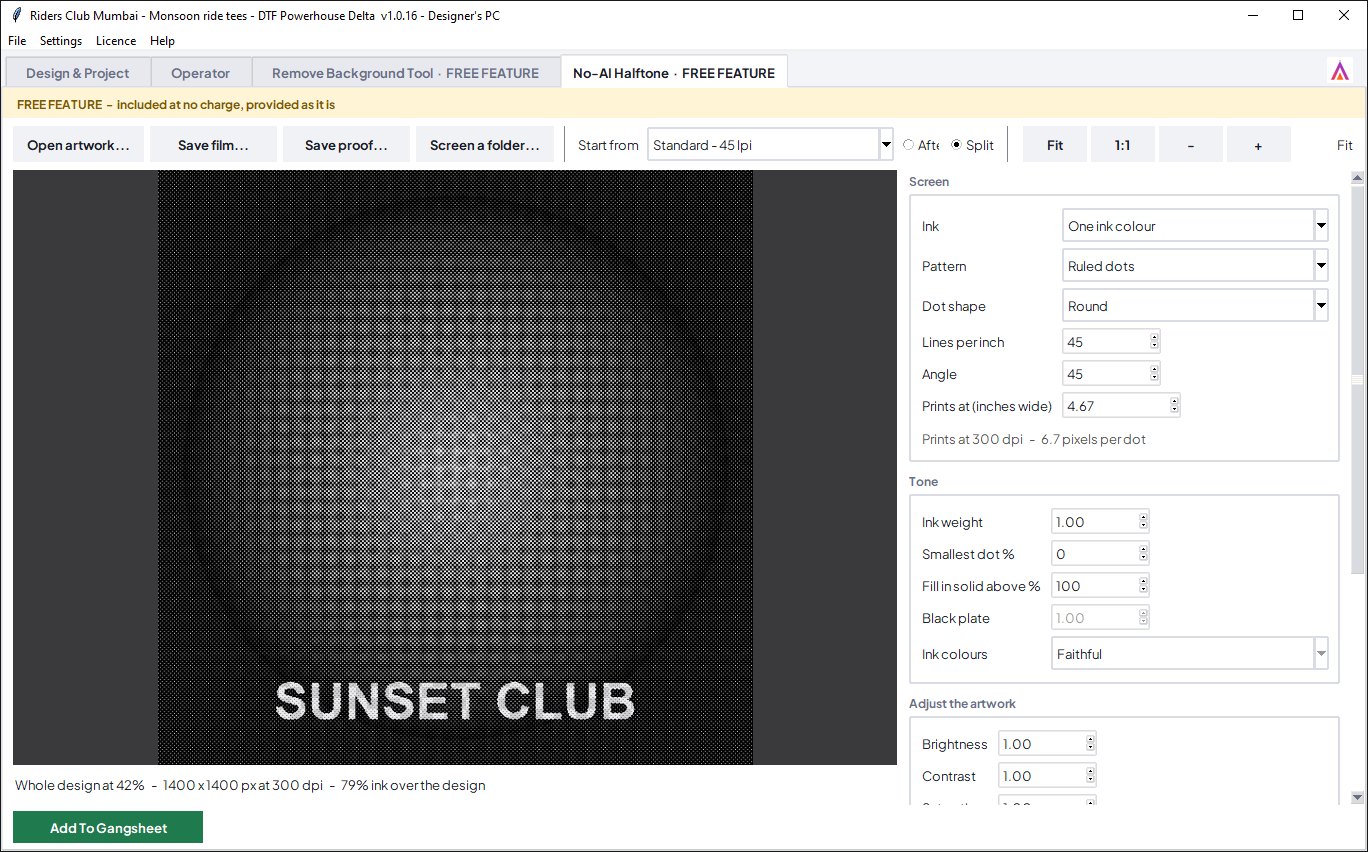
No-AI Halftone

  1. Open artwork... and choose the picture.
  2. Start from a preset, then set lines per inch, dot shape and angle if you need to.
  3. Before / After / Split compares the result with the original; Fit 1:1 - + zoom into the dots.
  4. Add To Gangsheet puts the halftone on the job, with the percentage on the button while it works.
The Remove Background Tool with a cut-out logo on a red garment colour
Remove Background Tool: a logo on white, cut out and seen on red. Tap the picture to see it large.
The No-AI Halftone tool
No-AI Halftone: the picture turned into dots, ready for the gangsheet. Tap the picture to see it large.
9

Renewal, terms and help

  • 8 days before the licence ends the program tells you when it opens, once a day, and we write to your shop's email address: contact admin and activate the subscription in advance to avail uninterrupted services.
  • Renewing keeps the same three keys. Nothing is reinstalled, nothing is lost.
  • If a licence runs out, the program stops on all three PCs until it is renewed. Your jobs, clients and accounts stay as they are.
  • Updates arrive in the program: Licence → Check For Updates....
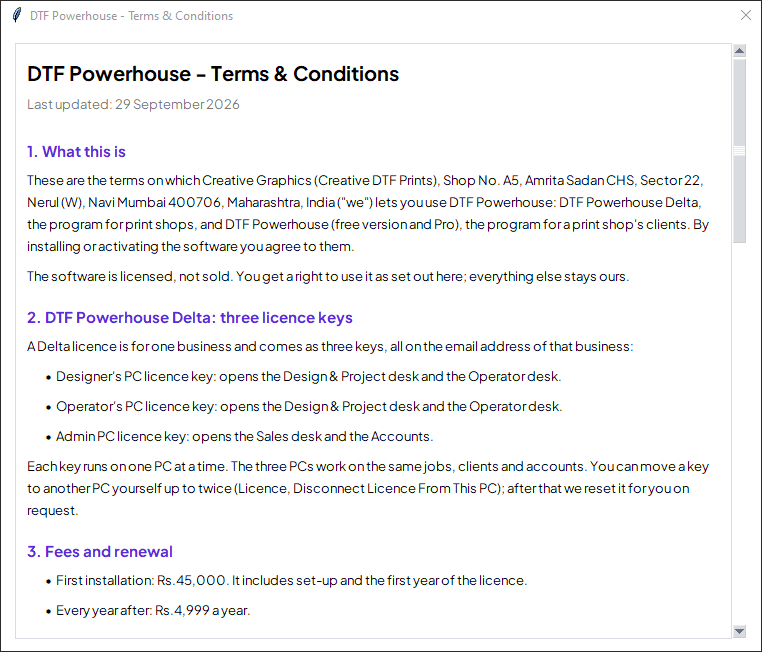
  • Help → Terms & Conditions and Privacy show the agreement inside the program; the same text is on this website.

WhatsApp +91 86555 57070

The renewal notice"Your licence ends on ... Contact admin and activate subscription in advance to avail uninterrupted services." It shows when the program opens, once a day, from 8 days before the end. The Licence window says it too.
The Terms and Conditions window
Help → Terms & Conditions, inside the program. Tap the picture to see it large.